
What makes a good sticker image?
A good sticker image usually has one clear subject. It uses bold outlines, simple shapes, and flat colors. A transparent background helps the sticker sit on different surfaces. A white die-cut border is a common look, especially for print stickers. These are design tips, not hard rules.
The goal is to make the image easy to read at small size. Keep the composition clean. Avoid tiny details, messy shadows, and background clutter. If the subject has text, keep that text large and legible. If you are new to image prompts, see beginner's guide to AI image prompts. For simple line styles, the guide to AI coloring pages can help you choose shapes that stay clear after export.
How do you plan the sticker?
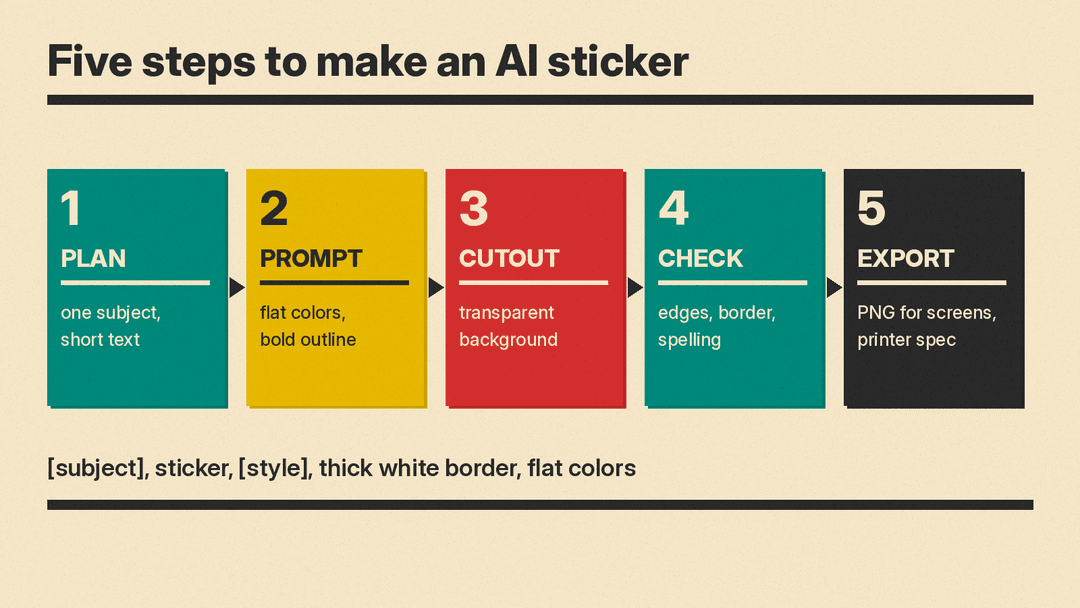
Before prompting, decide a few items.
- Subject. Pick one object, animal, mascot, icon, or short phrase. A single subject cuts cleanly.
- Style. Choose a look, such as flat vector, badge, pixel art, retro type, or simple cartoon.
- Size and use. Think about where it will appear. A laptop sticker needs a clear outline at small size. A messaging sticker needs a shape that fits chat windows.
- Text. Decide if you want words. If yes, keep them short. One to three words is safest.
A simple plan makes the prompt easier to repeat and refine. If you are making many stickers, pick one style first. Then change only the subject.
How do you write the prompt?
Use a template. A sticker prompt should name the subject, the style, the border, the background, and any text.
Template:
"[Subject] sticker, [style], thick white border, flat colors, bold outline, no shadow, isolated on a plain white background, simple shapes, clean edges"
If your tool supports transparency, replace the last part with:
"[Subject] sticker, [style], thick white border, flat colors, bold outline, no shadow, transparent background, simple shapes, clean edges"
Example prompts:
- "A cat holding a coffee cup sticker, cute cartoon style, thick white border, flat colors, bold outline, no shadow, transparent background"
- "A mountain badge sticker, simple vector style, thick white border, flat colors, bold outline, no shadow, isolated on a plain white background"
- "Retro Stay Curious text sticker, vintage typography, thick white border, flat colors, bold outline, no shadow, transparent background"
- "A potted plant sticker, minimal vector style, thick white border, flat colors, bold outline, no shadow, isolated on a plain white background"
- "A pixel heart sticker, 8-bit style, thick white border, flat colors, bold outline, no shadow, transparent background"
- "A taco mascot sticker, playful cartoon style, thick white border, flat colors, bold outline, no shadow, isolated on a plain white background"
- "A rocket sticker, clean flat vector style, thick white border, flat colors, bold outline, no shadow, transparent background"
- "A laptop sticker with a simple icon, minimal geometric style, thick white border, flat colors, bold outline, no shadow, isolated on a plain white background"
A few prompting tips matter.
- Say "isolated on a plain white background" when you want a clean object with no scene.
- Say "transparent background" when the tool supports transparency directly.
- Say "thick white border" if you want the die-cut look in the image itself.
- Say "vector style" and "flat colors" for simple shapes and clear edges.
- Say "no shadow" when you want the sticker to read as a cutout, not a photo.
- Keep text short. Long phrases often become hard to read and may produce broken letters. Check spelling and wording after generation.
How do you get a transparent background?
There are two routes. Ask the generator for transparency, or remove the background after the image is made.
Ask the generator for transparency
Some image tools can produce transparent files from the start.
The OpenAI Image API has a background option. OpenAI lists three values: transparent, opaque, and automatic. For transparent backgrounds, set background to "transparent" and use output format png or webp. The same docs say the GPT Image 2.6 models can also output SVG, which OpenAI suggests for graphics that need editable paths, shapes, and colors, such as icons and illustrations. For more on API file handling and SVG use, see GPT Image 2.6 API: Complexity, SVG, GIF, Markup.
ByteDance says Seedream 5.5 can generate native RGBA images with an alpha channel that supports full and partial transparency. RGBA can store color and an alpha channel. This lets parts of the image be clear or partly clear. See the Seedream 5.5 post.
When you use a direct transparency option, inspect the file anyway. Sometimes the model adds a faint box, a glow, or a colored edge around the subject.
Remove the background after generation
If the generator gives you a white or gray background, use a background remover. Adobe offers a free background remover in Adobe Firefly. Adobe lists these steps:
- Log in to Adobe Firefly with an Adobe ID, or create a free account.
- Upload a photo in the Image module, or pick a generated image.
- Choose Remove Background from Quick Actions in the Edit tab.
- Download the result as a PNG with a transparent background.
Adobe lists supported upload types as JPEG, PNG, or WEBP. The maximum file size listed is 50MB. Adobe also says you can turn your subject into a sticker, generate a new background, or upscale the image. See Adobe's background remover page for the current steps.
This route gives you more control. You can compare the result to the original and decide whether the edge looks clean. It may also be better if your generator does not handle transparency well.
How do you add a border and check the edges?
A border can come from the prompt, from a background remover, or from an editing step later. If the generated image already has a thick white border, you may still need to trim the outer edges.
Zoom in. Look for stray pixels around the subject. Look for halo edges, where a faint color ring remains from the old background. Look for broken letters, warped words, extra limbs, or accidental shapes near the edge. These small defects become obvious when the sticker is placed on a colored background.
If the text is wrong, regenerate the image. If only a small edge is rough, try editing the mask, cropping tighter, or using the tool's cleanup feature. If the white border is missing, you can often add it later in a graphics editor. Keep the border even and avoid placing details too close to the edge.
How do you export the sticker file?
Choose the file type based on use.
For digital stickers, PNG is a common choice. It supports transparency, so the sticker can sit on chat windows, profile pictures, or app screens. WEBP can also support transparency. Ask the generator or the tool that will host the image which file type it expects.
For print stickers, do not guess the file rules. Print shops vary. Follow the printer's file spec. Ask about cut lines and resolution. There is no universal print spec to assume here.
If you need a vector file, ask whether the tool can export SVG or whether the printer accepts vector artwork. SVG files can help when a design needs editable shapes, colors, and paths. A sticker with raster effects, gradients, or complex edges may still need a PNG or WEBP version.
What rights and safety rules matter?
Sticker sellers and creators need to be careful. Avoid copying trademarks, logos, brand designs, or characters you do not own. If a subject resembles a protected character too closely, change it. Do not use a real logo, even in a stylized prompt, unless you have the right to use it.
Also check the terms of the tool you use before selling. Some tools have different rules for personal use, business use, and redistribution. Some may have limits on generated content or branding. Keep records of your prompts, edits, and final files if you need to show your process later.
For safety, avoid designs that could be mistaken for official products. Keep your text and visuals original. A simple mascot, plant, heart, or badge is safer than a famous cartoon figure.
What questions do people ask about AI stickers?
Can AI make a transparent PNG?
Yes, some AI image tools can. The OpenAI Image API can set the background to "transparent" and return PNG or WEBP output. ByteDance says Seedream 5.5 can generate native RGBA images with full and partial transparency. A transparent PNG stores areas with no visible color, so the sticker can sit on different backgrounds. You should still inspect the edge for accidental boxes or halos.
Why does my sticker have a white box?
A white box usually means the image was saved with an opaque background. Asking for a "transparent background" in a prompt does not always change the file itself, and JPEG files cannot store transparency at all. If this happens, set the background option to transparent if available, use PNG or WEBP output, or remove the background after generation.
What file format is best for stickers?
For digital use, PNG is often a safe choice because it supports transparency. WEBP is another option when you need a transparent image. For print, use the format required by the printer, such as PNG or SVG, only if that format matches their file spec. Ask the printer for cut lines and resolution guidance.
Sources
- OpenAI, Image generation API guide: https://developers.openai.com/api/docs/guides/image-generation
- Adobe Firefly, free image background remover: https://www.adobe.com/express/feature/image/remove-background
- llms.blog, Seedream 5.5 image model post: https://www.llms.blog/posts/bytedance-seedream-5-5-image-model
- ByteDance Seed, Introducing Seedream 5.5 (blog): https://seed.bytedance.com/en/blog/more-realistic-images-more-stable-editing-across-100-rounds-introducing-seedream-5-5
