
AI image tools can produce a shirt graphic in minutes. But a t-shirt needs a print-ready file, not just a nice picture. A good design must survive the printing process without losing detail or color accuracy. This guide covers the full workflow: choosing a design type, writing prompts, cleaning up backgrounds, sizing files correctly, and testing before you sell.
What Type of T-Shirt Design Should You Make?
Decide on the design style before you open any tool. The best designs for AI generation are simple. Complex photorealistic art is harder to turn into a clean print file, because soft gradients and tiny details are easy to lose on fabric.
Consider these four categories:
- Text-only designs. These rely on font choice and layout.
- Graphic plus text. A small icon paired with a slogan.
- Illustration. Flat colors and clear shapes work best here.
- Pattern. Repeating elements that tile well.
Simple shapes and a few flat colors print more cleanly than photoreal art. Start with vector-style concepts: they are easier to clean up, resize and recolor. If you want a logo-style mark, our guide on designing a logo with AI covers that workflow in more detail.
How Do You Write a Good Prompt for a T-Shirt?
A t-shirt prompt needs specific constraints. You are not making an art piece for a gallery. You are making a graphic for fabric. Name the subject clearly. Specify the style. Limit the color count. Demand a clean background.
Use terms like "vector illustration," "screen print look," "line art," or "retro badge." Add "isolated on a plain background" so the tool does not generate a scene. Include "centered" to help with placement later. If you want text, specify it exactly. Short quoted text works best. Long sentences often get garbled. Check every letter in your prompt if you include words.
Here are five sample prompts to try:
- "Retro badge logo for a running club, circular emblem, bold sans-serif text 'SPEED', two colors black and white, isolated on plain background."
- "Minimalist line-art cat sitting, single continuous black line, no fill, centered on plain background."
- "Retro sunset gradient behind a mountain silhouette, three horizontal stripes, vintage 70s palette, text 'CALIFORNIA' at bottom, isolated on plain background."
- "Bold one-word typography 'HUSTLE', thick block letters, distressed texture, black ink only, centered on plain background."
- "Flat vector illustration of a coffee cup, steam rising, pastel colors, no outlines, isolated on plain background."
Avoid asking for complex scenes. Avoid requesting realistic lighting. Keep the focus on shape and color blocks.
How Do You Get a Transparent Background?
A transparent background lets the shirt color show through around your design. Many AI images come with a filled background, so you need to remove it or ask for transparency from the start.
If you use OpenAI's Image API directly, the OpenAI image generation guide says you can set background to "transparent" and use PNG or WebP as the output format. The same guide says GPT-Image-2.6 also supports SVG output through the API. OpenAI describes SVG as a fit for graphics that need editable paths, shapes, and colors, such as icons and illustrations. Because SVG is a vector format, it can be resized without turning blurry.
If you use a chat interface, ask the model to place the subject on a plain white or black background. Then use a background remover tool to cut out the subject. This adds a step but gives you control over edges. For similar workflows involving transparent assets, see our guide on making stickers with AI.
Why Should You Watch Out for Semi-Transparency?
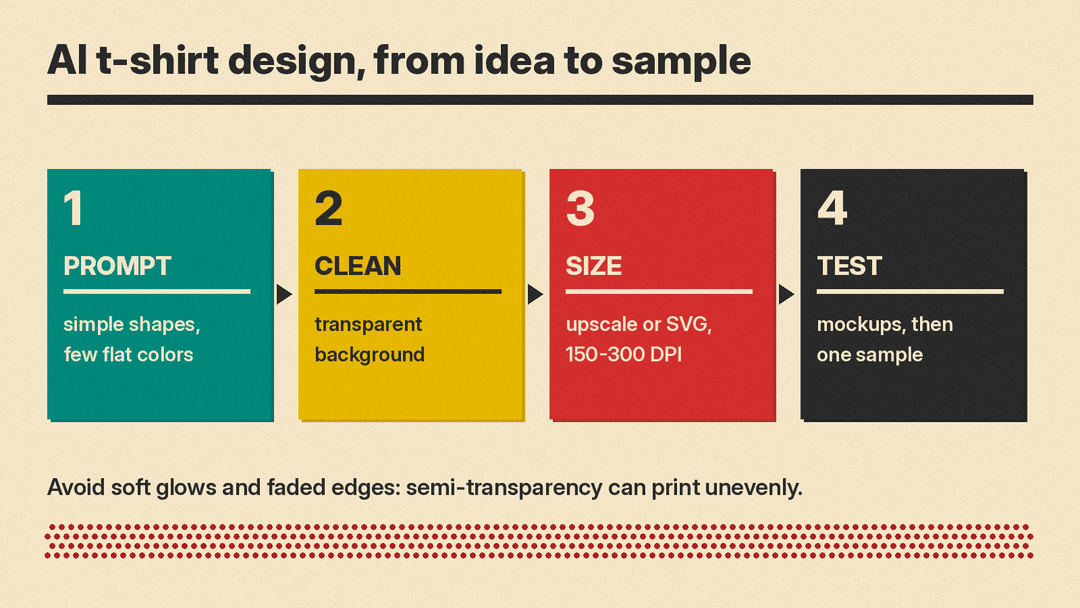
Not all transparency is equal. Printful's print file guide notes that fully transparent elements disappear during printing. However, semi-transparent elements might not print as expected on DTG machines.
Printful lists effects like feather brushes and low-opacity layers as examples of semi-transparency. Soft glows and faded edges fall in the same group. They can look good on screen and still print in a patchy way.
To avoid this, stick to hard edges. Use 100 percent opaque colors or 100 percent transparent areas. Do not use blur filters or drop shadows unless you convert them to solid shapes first. If you need depth, use distinct color steps rather than gradients. This makes the print more likely to match your screen design.
What Size and Resolution Does Your File Need?
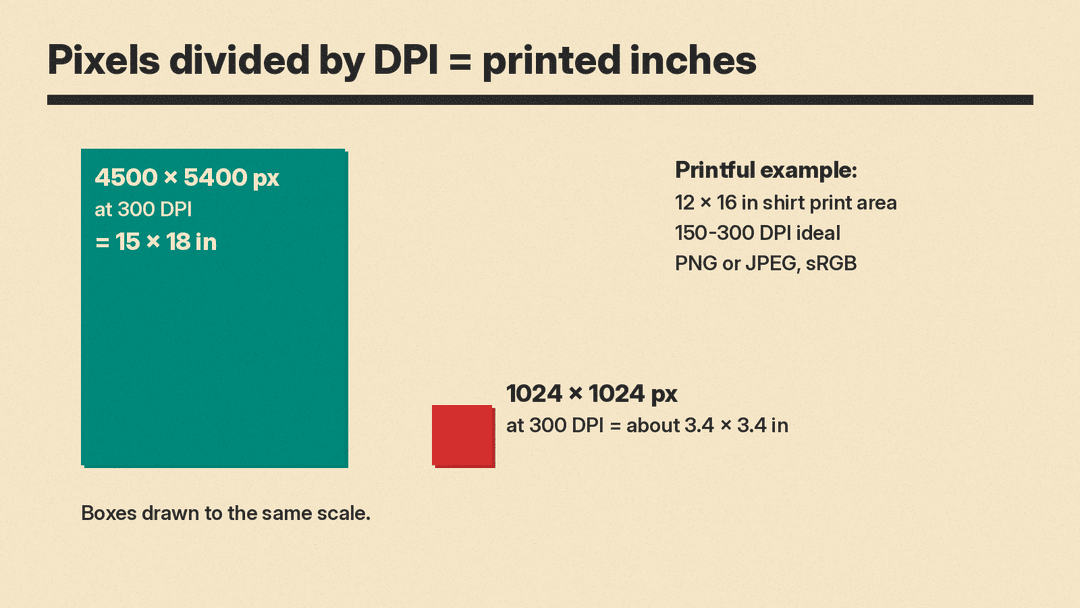
Resolution determines how sharp your design looks on the shirt. Printful recommends 150 to 300 DPI (dots per inch) for optimal quality. Their guide provides a maximum print area example of 12 x 16 inches for standard t-shirts. Some select DTG products allow up to 15 x 18 inches.
The guide uses 4500 x 5400 pixels as its example of pixel dimensions. At 300 DPI, that is 15 x 18 inches. AI images are usually much smaller. OpenAI's image guide, for example, lists 1024 x 1024 as a recommended square size for its GPT-Image-2.5 models and caps each edge at 3840 pixels. A square image of 1024 x 1024 pixels, for example, prints at only about 3.4 inches wide at 300 DPI. You cannot simply stretch this image. It will become blurry and pixelated.
You have two options. First, upscale the image using specialized software. See our AI image upscaling guide for methods to increase resolution without losing detail. Second, convert your design to SVG. Vector formats do not rely on pixels. They calculate shapes mathematically. This makes them ideal for logos and simple graphics.
The formula is simple. Pixels divided by DPI equals inches. If you have a 3000-pixel wide image and want to print it at 300 DPI, it will be 10 inches wide. If you print it at 150 DPI, it will be 20 inches wide but less sharp. Printful suggests 300 DPI for small products with a lot of detail. It accepts PNG and JPEG files and calls PNG the best format for transparency. It also asks for the sRGB color profile.
How Do You Fit the Design to the Shirt Color?
A design that looks great on white may vanish on black. Test your artwork on both dark and light mockups.
Dark shirts usually need light outlines or bright colors, or dark parts of the design will disappear into the fabric. Light shirts suit darker, detailed graphics. Avoid very thin lines, which are easy to lose in print. Make strokes slightly heavier if you target dark shirts.
Contrast is key. Ensure there is enough difference between the design and the shirt color. If you plan to sell multiple colorways, create separate versions optimized for each. Or, use a versatile palette that works on neutral tones like grey, navy, and black.
What Should You Check Before Ordering?
Never order a bulk run based on a digital preview alone. Inspect the file closely.
Zoom to 100 percent on your computer screen. Look for garbled letters. OpenAI's own guide says its image model can still struggle with precise text placement and clarity. Check every character. Look for stray marks or artifacts around the edges. These can print as unwanted specks. Examine hands and fingers if your design includes humans. Look for extra or missing fingers. Clean them up manually.
Check for edge halos. These are faint outlines left behind after removing a background. They show up as a different color on the shirt. Remove them carefully.
Finally, order one sample. A screen preview cannot show fabric texture or how the ink sits on the shirt. A physical test lets you check color and size before you order more.
How Do You Handle Rights and Originality?
AI tools generate images based on training data. You must consider ownership and copyright.
Do not prompt for logos, brand names, or famous characters you do not own. Stick to original concepts. Describe generic subjects like "a wolf" instead of a named character from a film or show.
Read your print shop's content rules and your AI tool's terms before you sell anything. Rules on AI images and commercial use differ from service to service, and they can change.
When in doubt, ask a legal professional. This article is general guidance, not legal advice.
Quick Checklist
- Choose a simple design style with flat colors.
- Write a prompt specifying style, color count, and background.
- Generate the image with a transparent background via API or removal tool.
- Convert to SVG if possible for scalability.
- Upscale raster images to meet minimum pixel dimensions.
- Verify resolution is 150 to 300 DPI, with 300 DPI for small, detailed prints.
- Remove semi-transparent effects and soft edges.
- Test the design on dark and light mockups.
- Zoom to 100 percent to check for text errors and artifacts.
- Confirm commercial rights with the AI provider and print shop.
- Order a single physical sample before scaling up.
