
Old family photos rarely stay in good shape. Prints get scratched, fade near windows, yellow in drawers, and pick up water damage in attics. Faces turn soft and blurry. Most photos taken before color film became common show the world in black and white.
AI tools can now repair much of this damage without professional retouching skills. Restoration filters remove scratches and rebuild lost detail. Colorization tools add color to black and white images automatically. With a scanner, a photo editor, and an afternoon, you can make a box of old prints ready to share.
One warning before you start. When AI colorizes a photo, the colors are a prediction, not a record. The software guesses based on patterns it learned from other images. It has never seen your family. Treat colorized results as reconstructions, and keep the original safe so you can always go back.
Step 1: How Should You Scan the Old Photo?
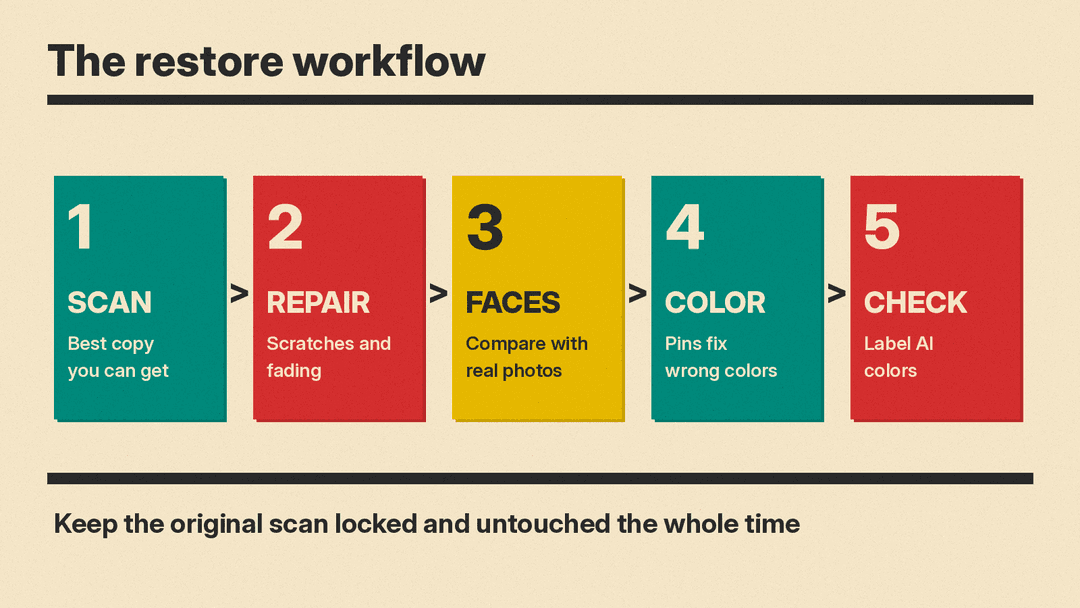
Everything that follows depends on the copy you feed the tools. Start from the best copy you can get.
If you have access to a flatbed scanner, use one. Clean the glass first, since dust shows up as spots that look like damage. Handle prints by the edges. Scan at the highest resolution your scanner offers, so you have plenty of pixels to work with. Check the result at full size. If the scan looks soft or has glare, scan again before you start editing.
Without a scanner, a phone camera can work. Place the photo on a flat surface under soft, even light. Avoid direct flash and bright windows. Hold the camera parallel to the photo and fill the frame with the print.
Two habits help here. Look at each photo before you scan it, since a careful pass now saves editing time later. And do not attempt physical repairs such as taping a torn print, since self-stick tape can be very hard to remove and often causes condition problems over time. Do all repair work digitally, on the copy.
Step 2: Why Keep the Original Scan Untouched?
Adobe's old photo restoration guide makes this the first rule of the workflow. Bring the scan in as the background layer, lock that layer, make no adjustments to it, and do all your work on new layers above it.
In plain terms, a layer is a clear sheet stacked over your image. When you edit on a new layer, the pixels on the locked background sheet never change. Editors call this nondestructive work.
It matters for three reasons. You can compare the restored version with the original at any time. You can hide or delete any change you dislike without starting over. And anyone who opens the file later can see what was original and what was repaired.
Keep the same principle outside the software. The physical print stays in the box, away from light and damp, since the Library of Congress notes that photos exposed to light undergo irreversible light damage over time. Only the digital copy gets worked on.
Step 3: How Do You Repair Scratches, Stains, and Fading?
With the scan locked, run an AI restoration filter. The steps below use Photoshop on desktop, a subscription app with a free trial listed on Adobe's plans page. In Photoshop, open Filter, then Neural Filters, then Photo Restoration. If the filter shows a download icon, download it first. It then opens a panel with a preview and sliders. Adobe's Neural Filters gallery lists Photo Restoration as a Beta filter, still under development, so results may vary.
Adobe's guide highlights three main controls: image enhancement, enhance face, and scratch reduction. Move each slider a little at a time and watch the preview. Small changes are safer than large ones. You want the same photo in better condition, not a different photo.
No filter catches everything. For leftover marks, Adobe suggests two manual tools. The Spot Healing Brush, set to Content Aware with Sample All Layers enabled, lets you dab over the areas you want to heal. If marks still remain, Adobe says to cover them with the Clone Stamp tool, which copies pixels from an area you choose onto the damaged spot.
Work in passes. Fix the big damage first, then zoom in for small specks. Do this work on new layers above the locked scan so every stroke stays reversible.
Step 4: How Do You Fix Blurry Faces?
Faces are often what people care about most. Small prints, soft focus, and grain can wipe out their fine detail, and simple sharpening cannot bring it back.
Face restoration tools take a different approach. Instead of sharpening, they rebuild faces. They learn what faces look like and reconstruct plausible eyes, noses, and mouths where detail is missing. The Photo Restoration filter in Photoshop includes an enhance face slider for this. A well known open source example is GFPGAN from Tencent ARC, whose project page says it "aims at developing Practical Algorithms for Real-world Face Restoration."
Rebuilt faces carry a specific risk. Because the tool guesses, the result can drift from the real person. It may smooth away the features that made a face recognizable, or invent a slightly different face entirely. GFPGAN's own model notes list "a slight change on identity" as a weakness of its V1.3 model. Compare any restored face with other photos of the same person, ideally from around the same period. Show it to relatives who knew them. If the face looks wrong, reduce the strength of the effect or leave that face closer to its original state.
Step 5: How Do You Colorize a Black and White Photo?
Photoshop includes a Colorize neural filter. Open Filter, then Neural Filters, and find Colorize in the list. Adobe's colorize guide places it under Beta filters, while the Neural Filters gallery lists it as a featured filter, so check both sections. Download it with the cloud icon, then toggle it on. It applies colors to the image automatically and shows a preview.
Automatic color is a starting point, not the final answer. The filter offers color balance sliders for adjusting the overall result. For specific fixes, use the Color Picker to drop color pins on areas you want to control, such as a dress, a uniform, or a car. The filter places a pin there and fills the surrounding area with the color you picked. Alt-drag (Option-drag on a Mac) duplicates a pin when you want the same color in another spot.
The filter also asks where to put its result. Output options include Current Layer, Duplicate Layer, Duplicate Layer Masked, New Layer, and Smart Filter. Choose Smart Filter if you want the colorization to stay editable, since it preserves your ability to reopen the filter and change settings later.
Two preparation steps help. First, Adobe's colorize guide advises images with good contrast and proper exposure, and suggests avoiding faded, overexposed, or underexposed photos. If the print has faded, you can fix contrast first, for example with a Curves adjustment layer, which Adobe's restoration guide names as a way to control contrast. Second, the colorize guide lists converting the image to grayscale or black and white as a preparation step, so start from a black and white version of the photo.
Adobe's restoration guide adds one workflow tip for combining repair and color. After repairs are done, create a merged layer with Ctrl+Alt+Shift+E on Windows or Command+Option+Shift+E on a Mac. This makes a new layer that contains all your previous layers. Apply Colorize to that merged layer, then set its blending mode to Color, which Adobe says keeps the edit nondestructive.
What If the Photo Already Has Color but Has Faded?
A color photo that has faded needs its existing color brought back, not new color. Adobe describes the Colorize filter as a tool for black and white photos.
For these photos, Adobe's old photo restoration guide lists four tools. Auto Color creates colors based on what is already in the image. A Hue/Saturation adjustment layer gives you sliders for the intensity and type of color. The Levels panel lets you dial in the black point and adjust shadows, blacks, and midtones. The Clarity slider adjusts sharpness and middle tones.
Use them one at a time and compare against the untouched scan as you go. If relatives remember the original colors, ask them before you trust automatic corrections.
Step 6: Should You Upscale or Fill Missing Pieces?
Two optional steps come late in the workflow.
If you want to print the photo larger than the scan allows, upscaling adds pixels with AI instead of simple stretching. Results depend on the quality of your source, so repair first and upscale last. In Photoshop, Adobe's gallery describes the Super Zoom neural filter as a way to enlarge images while AI compensates for resolution loss. See our guide on how to upscale images with AI for the process and tradeoffs.
If part of the image is missing entirely, such as a torn corner, AI can fill the gap with generated content that matches the surroundings. This is another kind of informed guess, so keep filled areas modest. See inpainting and outpainting explained for when each technique applies.
Step 7: How Should You Export and Save the Results?
Adobe notes that you can save the finished photo as JPG, TIFF, PNG, or another format. As a practical habit, keep a high quality master copy in a format like TIFF or PNG, and export smaller JPGs for sharing with family. If your editor supports it, also keep the layered working file so you can adjust the image later.
Whatever you choose, keep three things together. The untouched scan of the original print. The restored file. And a short note recording that repairs were made and that colors were added by AI. The note can live in the file name, in the same folder, or written on the back of a new print. Relatives in later years will want to know which parts of the image are original and which are reconstruction. For the digital files, the Library of Congress suggests descriptive file names, a brief written description, and at least two copies stored in different places.
What Are the Limits of AI Restoration?
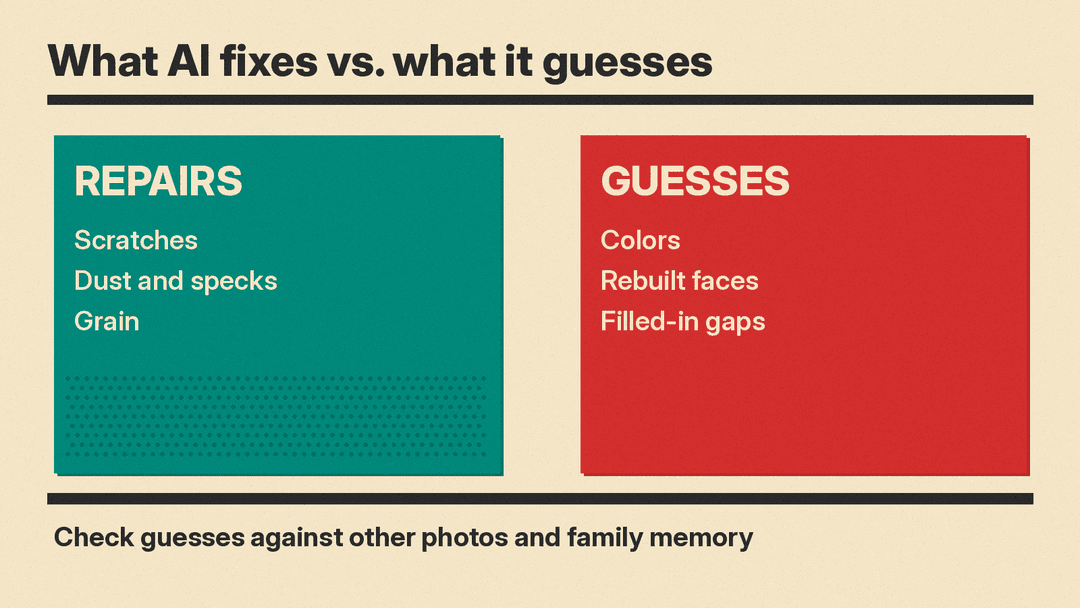
AI restoration is good at some jobs and unreliable at others. As a rule of thumb, it handles scratches, dust, and grain best, because those sit on top of the image and can be replaced with matching texture. It handles color less reliably, because a black and white print holds no color information at all. It handles faces with mixed results, because a face must resemble one specific person, not an average one.
Assume every color in a colorized photo is a guess. The software cannot know the true color of your grandfather's car or the wall behind him. It may be right, or it may be confidently wrong.
Check results against anything real you can find: other photos of the same person or place, written notes, and relatives' memories. When you share colorized images as family history, label them as colorized by AI. Do not present a reconstruction as an original record. The honest description is that the image shows what the scene may have looked like, based on a damaged original and software prediction.
Restoration and Colorization Checklist
- Scan or photograph the print carefully, and start from the best copy you can get.
- Bring the scan in as a locked background layer, and make no changes to it.
- Run an AI restoration filter for damage, then clean leftover marks with the Spot Healing Brush and Clone Stamp.
- Treat rebuilt faces with caution, and compare them with other photos of the person.
- Fix exposure and contrast before colorizing, and start from a black and white version of the photo.
- Use color pins to correct colors the AI got wrong, and keep the colorization editable with Smart Filter.
- Revive faded color photos with Auto Color, Hue/Saturation, Levels, and Clarity instead of colorizing them.
- Upscale only if you plan to print larger, and inpaint missing areas sparingly.
- Export a copy, and keep the scan, the restored file, and a note that colors were added by AI.
- Label colorized images whenever you share them.
Sources
- Adobe, old photo restoration guide
- GFPGAN, Tencent ARC, on GitHub
- Adobe Help, colorize images with neural filters
- Adobe Help, Neural Filters gallery
- Adobe, Photoshop plans
- U.S. National Archives, handling and storing photographs
- Library of Congress, photographs preservation FAQ
- Library of Congress, personal archiving of digital photos
