
Every open model you can download from Hugging Face comes with a short document attached: the model card. It is the closest thing an open model has to a label on a box. It tells you what the model is, who it is for, what it was trained on, how it scored on tests, and, most important for many readers, what you are allowed to do with it.
If you skip it and go straight to the download button, you can end up with a model that cannot be used commercially, a copy of a copy with no clear origin, or a benchmark score that nobody can trace. This guide explains what a model card is and gives you a simple checklist to read one in a few minutes.
What is a model card?
A model card is a file that comes with a model and gives you useful information about it. On the Hugging Face Hub, it is simply the README.md file in the model's repository, shown as the main page when you open the model. According to Hugging Face's documentation, the card should describe:
- the model itself
- its intended uses and potential limitations, including biases and ethical considerations
- the training parameters and experiment details
- which datasets were used to train it
- its evaluation results
For the limitations and ethics part, the Hugging Face docs point to Mitchell, 2018, the paper Model Cards for Model Reporting. This guide uses the Hugging Face Hub as the example.
The two parts of every model card
A model card on the Hub has two parts, and the information in them overlaps.
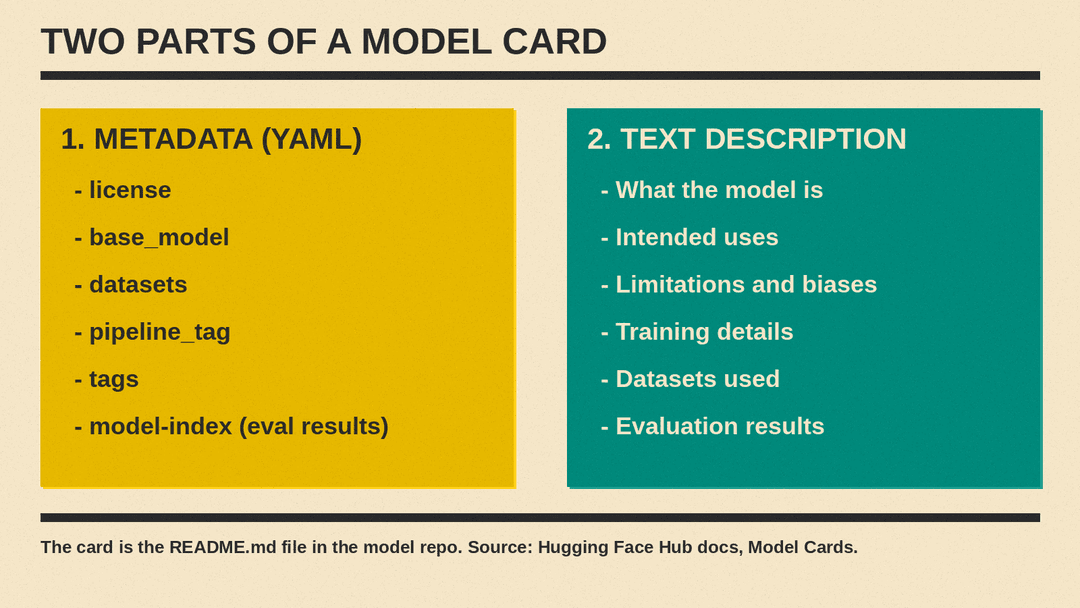
1. The metadata. At the very top of the README.md file there is a short block of structured data written in YAML, a simple settings format. It holds fields such as license, datasets, base_model, tags and language. You usually do not read this block directly. The Hub reads it for you and turns it into the labels and links you see on the model page, such as the license badge and the "Datasets used to train" line. It also powers the filters on the Hugging Face model search, so you can, for example, show only models with a certain license or task.
2. The text description. Below the metadata is normal written text. This is where the authors explain the model in their own words: what it does, how it was trained, how to run it, and where it falls short. Hugging Face publishes a model card template and an annotated guide that explain how to fill in each section.
A five-step checklist for reading a model card
You do not need to read every word. These five checks cover the basics if you want to try or build with an open model.
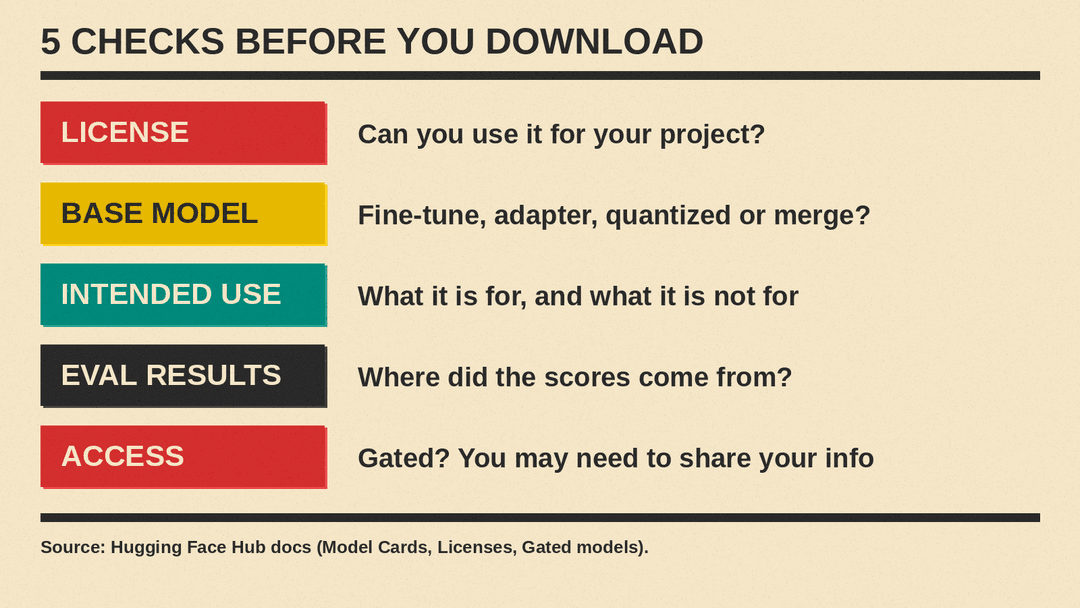
1. Check the license first
The license tells you what you may and may not do with the model. The Hub shows it on the model page, taken from the license field in the metadata, and you can filter models by license in search.
The Hub's list of licenses shows how wide the range is. It includes common open source software licenses such as Apache 2.0 and MIT. It includes Creative Commons licenses, some of which are marked "Non Commercial". And it includes licenses written by model makers for their own models, such as the Llama Community License Agreements, the Gemma Terms of Use and the Grok 2 Community License Agreement. There are also research-only licenses, such as the FAIR Noncommercial Research License and the Apple Model License for Research.
Two things to watch for:
- "Other" as the license. If the license field says
other, the authors use a license that is not on the Hub's list. The docs say they should give it a name and a link to the license, or add its text in a LICENSE file in the repository. Open that text and read it. - Model maker licenses. Licenses such as the Llama, Gemma or Grok 2 agreements were written by the model makers for their own models. Read the terms before you build anything you plan to sell or ship. Our MiniMax M3.1 Flash explainer walks through one such community license.
Hugging Face's own advice is short: seek out and respect a project's license if you plan to use its code or data. This guide is not legal advice. If your use is commercial or unusual, read the full license text, and ask a lawyer if the stakes are high.
2. Find out where the model came from
Many models on the Hub are not original. They are built on top of another model. The model card can say this with the base_model field, and the Hub docs list four kinds of relationship:
- Fine-tune: the base model was trained further on new data.
- Adapter: a small add-on (for example LoRA) that changes the behavior of the base model.
- Quantized: a compressed copy of the base model that uses less memory.
- Merge: a blend of two or more existing models.
When this field is filled in, the model page shows the base model, and you can click through to it. This matters for two reasons. First, the base model's license and limitations usually still matter, so check its card too. Second, if a card for a fine-tune or a quantized copy has no base model listed, you have less information about where the model came from.
The card can also have a new_version field. If it does, the Hub shows a link to the latest version of the model. If you see that link, you are probably looking at an older release.
3. Read the intended uses and limitations
A good card says what the model was built for (for example chat, coding, translation or image description) and what it should not be used for. It should also list known limitations and biases.
On the Hub, the pipeline_tag in the metadata shows the type of task the model is meant for, such as text generation. It appears on the model page and is used for search filters, so it is a quick first check that you have the right kind of model.
If the card says nothing about limitations, treat that as missing information, not as a sign that the model has none.
4. Look at the evaluation results, and where they came from
Model cards often include benchmark scores. The Hub can show them in a results widget on the model page when the authors add them in a structured format in the metadata. The Hub docs also let authors name the source of each result, such as the leaderboard where it was measured.
When you read scores, ask three questions:
- Who ran the test? A score from an independent leaderboard is different from a score the authors measured themselves.
- Which test? A strong score on one benchmark says little about a task the benchmark does not cover.
- Which version of the model? Scores for the full model may not apply to a fine-tuned or quantized copy of it.
If the card links to a paper, the Hub adds an arxiv tag to the model. Clicking it takes you to the paper page, where you can see how the tests were run.
5. Check whether the model is gated
Some models do not let you download the files right away. These are called gated models. To get access, you submit an access request. According to Hugging Face, this shares your Hugging Face username and email address with the model authors, unless the authors chose not to collect them. Authors can also add their own questions to the request form.
Access can be granted automatically, or the authors can review each request by hand. Access is always given to individual users, not to whole organizations. A common use of gating, the docs say, is to share early research models before a wider release.
So if you see a request form instead of a file list, read what you are agreeing to and what information you are sharing before you click.
Extra details worth a glance
A few more signals on a model card can help you decide.
- Datasets used to train. If the authors list datasets in the metadata, the page links to them. That lets you see what kind of data shaped the model.
- Tags. Most tags come from the metadata. One special tag,
not-for-all-audiences, makes the Hub show a warning message on the model page. - CO2 emissions. Hugging Face suggests the card as a place to report the carbon impact of training.
Why model cards matter for open models
With a closed model such as a chatbot you use in a browser, the company runs the model and sets the terms. With an open model, you get the files and more freedom, but also more responsibility. You choose which model to run, which copy to trust, and whether your use fits the license. Our list of the best open-source LLMs in 2026 is one place to start, and our guide to running an AI model on your own laptop covers what comes after the download.
The model card is where the authors hand you that information. A complete card with a clear license, a named base model, honest limitations and sourced test results is a good sign. A thin card is not proof of a bad model, but it means you need to check more yourself.
A good habit: before you download any open model, spend two minutes on the card. Check the license, the base model, the intended use, the source of the scores and the access terms. That small step saves time later.
