
The hardest thing to get from an AI image generator is not a beautiful picture. It is the same character twice. Ask for "a red-haired detective in a green coat" ten times and you will usually get ten different detectives. That is fine for a one-off illustration, but it breaks a comic, a children's book, a brand mascot or a series of social posts.
The good news is that current tools have features built for exactly this problem. Google's Gemini image generation guide has a section on character consistency, Midjourney's Edit model accepts reference images of characters, and OpenAI's image generation guide lets you build new images from one or more reference images. This guide turns those features into one simple workflow that works across tools. If you have not picked a tool yet, our comparison of the best AI image generators can help.
Why AI characters drift
An image model does not remember the last picture it made for you. Every new prompt is a fresh draw, and the words in your prompt leave a lot of room. "Red hair" covers hundreds of shades and cuts. "Green coat" could be a trench coat, a parka or a blazer. Each generation fills those gaps differently, so the character drifts.
There are two ways to close the gaps:
- Words: describe the character so precisely that there is less left to guess.
- Pictures: show the model an image of the character, so it copies what it sees instead of inventing it.
The workflow below uses both. Words alone get you close. Reference images do most of the heavy lifting.
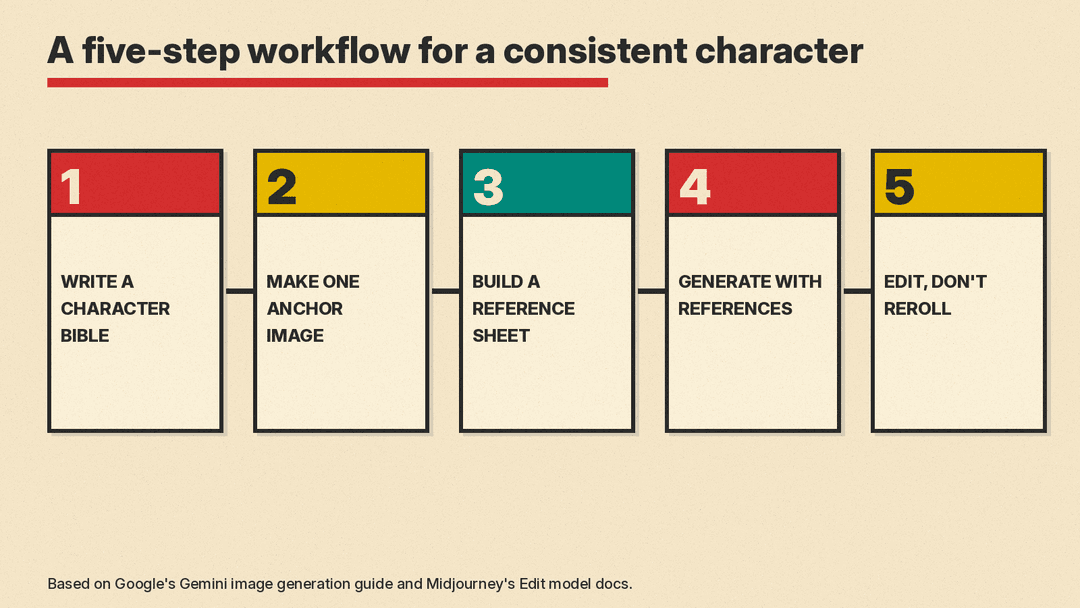
Step 1: Write a character bible
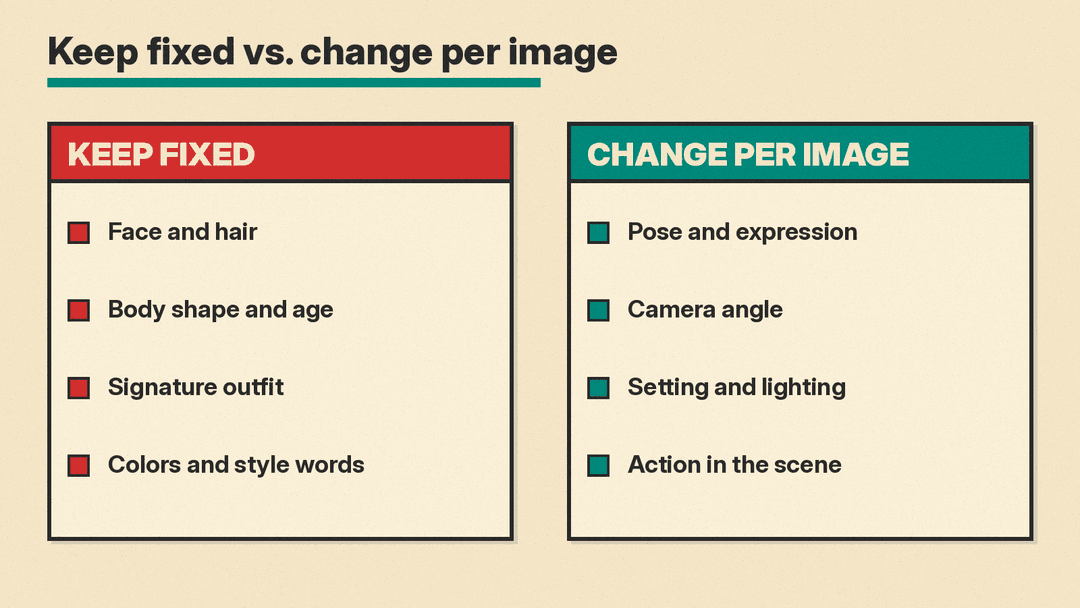
Before you generate anything, write a short, fixed description of your character and save it somewhere you can paste from. Think of it as a casting sheet. Cover:
- Face and hair: shape of face, eye color, hairstyle, hair color, any glasses or freckles.
- Body: rough age, height, build.
- Signature outfit: one outfit described in detail, including colors.
- Art style: for example "flat vector illustration, thick outlines, muted colors" or "35mm film photo, soft daylight".
Be specific. Google's guide puts it plainly: "Be hyper-specific: The more detail you provide, the more control you have." Its example swaps "fantasy armor" for "ornate elven plate armor, etched with silver leaf patterns, with a high collar and pauldrons shaped like falcon wings." Apply the same habit to your character's coat, hair and face.
A sample bible:
Mira, a woman in her early 30s with a round face, short curly copper-red hair, green eyes and light freckles. Wears a knee-length olive green wool coat with large brass buttons, a mustard scarf and brown ankle boots. Flat vector illustration, thick charcoal outlines, muted colors, cream background.
Paste this exact text into every prompt. Do not rephrase it each time, because new wording invites new interpretations.
Step 2: Make one anchor image
Generate a handful of images from your bible and pick the single best one. This is your anchor: the official look of the character. Choose a clear, well-lit, front-facing or three-quarter view with the full outfit visible, on a plain background. Busy scenes make poor references because the model may copy the background too.
If no result is quite right, fix it with an edit rather than starting over. Google's guide recommends follow-ups such as "Keep everything the same, but change the character's expression to be more serious." Small, targeted changes keep what already works.
Step 3: Build a reference sheet
One image shows the character from one angle. To place them in new poses, the model benefits from seeing more. Use your anchor to generate a few views: front, side, back and a close-up of the face.
Google's guide describes this directly. You can create "360-degree views of a character by iteratively prompting for different angles," and "for best results, include previously generated images in subsequent prompts to maintain consistency." Midjourney's Edit model supports the same idea with prompts like "let's see this image from the front" or "let's see this image from behind."
Keep the sheet small and clean. A few strong views beat a pile of slightly different ones, since every reference you add is something the model will try to match.
Step 4: Generate new scenes with references
Now you can put the character to work. Each time, give the tool:
- Your reference image or images.
- Your character bible text, unchanged.
- The new part: the scene, pose, expression and camera angle.
How you attach references depends on the tool:
- Gemini (Nano Banana): you can upload images alongside your prompt and mix several reference images, including images of characters, in one request, per Google's guide. For tricky poses, Google suggests adding "a reference image of the selected pose." Our comparison of GPT Image 2.5 and Nano Banana 2.1 covers how the two models differ.
- Midjourney: the Edit model lets you attach reference images in the Imagine bar, and Midjourney says it replaces the older Omni Reference and Character Reference features. A lock icon keeps your images pinned to the Imagine bar across prompts, which saves re-uploading your character every time.
- ChatGPT and the OpenAI API: OpenAI's guide shows how to "use one or more images as a reference to generate a new image," and its Responses API supports multi-turn editing, so you can keep refining an image in the same conversation.
Midjourney also notes that its Edit model accepts written instructions, such as "make this silver knight ride the horse of fire holding the sword of flowers," as well as classic scene descriptions, and that adding the --raw parameter "reduces the extra creative flair" so your prompt has more influence. That can help when the model keeps stylizing your character away from the reference.
Step 5: Edit, do not reroll
When a new image is almost right, resist the urge to regenerate from scratch. A fresh roll throws away everything that matched. Instead, ask for a targeted fix: the scarf should be mustard, the hair is too long, the coat is missing its brass buttons.
For details that must survive an edit, such as a face or a logo on a shirt, Google's guide advises you to "describe them in great detail along with your edit request." In practice, that means repeating the relevant line of your character bible inside the edit prompt.
Two or more characters in one image
Scenes with several recurring characters are harder, because the model can blend their features. Midjourney's docs acknowledge this and give a practical tip: "If certain features or attributes are getting mixed up between your characters, it can be helpful to combine your characters into a single reference image."
A few more habits help:
- Give each character very different, easy-to-name traits: one tall with a red coat, one short with a blue hat.
- Name each character in the prompt and tie each reference to a name ("the woman in the first image", "the man in the second image").
- Describe who stands where. Google's guide suggests step-by-step instructions for complex scenes, such as setting the background first and then placing each element.
Keep the style consistent too
A character can look right and still feel off if the art style shifts between images. Keep your style words identical across prompts, and use your tool's style features if it has them. Midjourney's Edit model works with Style References, Moodboards and Personalization, and Midjourney recommends "describing the style in your prompt when using Style References and Moodboards to help 'activate' the aesthetic more consistently."
Two more prompt habits from Google's guide carry over well:
- Use positive descriptions instead of "no X". Google calls these semantic negative prompts: rather than "no cars," describe "an empty, deserted street with no signs of traffic."
- Use camera language. Photographic and cinematic terms control framing, which matters when you want a series of images to feel like one story.
A quick checklist
- Write one fixed character description and paste it unchanged every time.
- Pick one clean anchor image with a plain background.
- Generate a small set of angle views from the anchor and reuse them.
- Attach references to every new prompt; describe only what changes.
- Fix near-misses with targeted edits instead of new rolls.
- For multiple characters, make their traits very different, or combine them into one reference image.
- Keep style words, and style references if your tool has them, identical across the series.
What consistency will not fix
Even with references, results are not pixel-perfect. Small details such as buttons, jewelry, patterns and text drift most often, so check each image before you publish it. Also be careful about what you use as a reference. Uploading photos of real people, or of characters someone else owns, can raise consent, likeness and copyright questions, and each service's own usage policies apply. For original characters you created, the workflow above is the most reliable way to keep them looking like themselves.
